Challenging Arts & Crafts

Homemade Springrolls & how to make the Wrappers


Hi everyone!

Today, I´m posting my recipe for Springrolls I make at home including the
  selfmade springroll wrappers..It´s very easy to do once you´ve made the first one. 
The fillings vary according to your taste..meat, veggies,  or a mixture of both....
so here it is, I hope you will enjoy this blog. 


 Ingredients :

Wrapper

1 cup All-Purpose Flour
1 Cup Water
1 tbsp Corn Flour

Note: The 1 tbsp of corn flour will make the batter more elastic and the wrapper   
          would not break easily. Never use intense heat while drying the batter,
          otherwise the  wrappers would break...


 Preparations:

 
 1. Mix all ingredients to form a smooth batter. 


  2. Grease a non sticking pan using paper towel slightly moistened with
      cooking oil. Heat the pan under medium fire. 


 3.When pan becomes hot, remove the pan from fire and by using pastry brush, paint

    the batter briskly onto the pan covering its entire surface.  


4. Put the pan back but this time on low fire and slowly heat the batter

    til it gets dry, turning once.


  5. Place the wrappers on a platter and cover with plastic foil to prevent them from 

    drying til they are ready to use.


* * * * * * * * *  * * 


Cooking the fillings

Note:
There are many variations of fillings that could be used for your springrolls depending on your preference.. Here,  I used soya sprouts, crushed garlic, onions and cabbage plus the ground beef or 50/50 pork and beef.

Others prefer to use ground meat & cabbage strips only and some use vegetables only.


Ingredients:

150 grams ground beef or 50/50 ground beef and pork
2 cloves crushed garlic 
1 Onion - chopped
150 grams soya sprouts
1 1/2 Cups cabbage cut into strips of about 4-5 cm long
1 tbsp soya sauce (unsweetened)
salt & pepper

 1.  In a hot skillet or pan, fry the garlic, add the ground meat and stir fry til the meat
     becomes pale in color.
2. Add the chopped onions , soya sprouts, cabbage. sprinkle
    with 1 tbsp soya sauce. Continue frying & stirring until all vegetables become 
    tender. 
3. Season the fillings with salt & pepper, adjust seasoning according to your taste.
    Let stand to cool down a bit  before using..


Spread  the wrapper on the table  and put 2-3 tbsp of the fillings on it.


Fold the left & right side of the wrapper carefully towards the center 
as you see it in the pic above.

Fold the bottom edge carefully towards the center rolling 
it til it reaches the other edge. Simply tap the edge with a wet finger 
to seal the springroll.  


Use a large casserole for deep frying... fry the spring rolls  for around 5 minutes
 on each side or fry until golden Brown and crispy. Serve hot with Chili Sauce.


 Well guys, that´s just about a way to make your homemade Springroll wrappers 
and the fillings.  I hope you´ll try this because this is really a simple dish that is delicious.

Happy Cooking!

Wishing all a nice Sunday!


Carrot Ricotta Muffins


                               Carrot Ricotta Muffins                            


Ingredients:


Dough

500 g Flour
Salt
20 g yeast
200 ml milch
1 Egg -medium size
100 g butter
 
Carrot - Ricotta Fillings
200 g Carrots shredded
a bunch of coriander leaves - chopped
30 g ginger
125 cheddar or Emmentaler cheese
250 g Ricotta
2 eggyolks
2-3 tsp Curry powder
salt, Cayenne pepper


Preparations

1.
In a container, mix the flour and 1 tsp salt.
 Dissolve the yeast in a  lukewarm milk.
Add the yeast/milk, egg  and soft butter to the flour and
knead for 3 minutes. Cover the dough and place in a warm area
 for about 35 minutes until it becomes
a bit bulky in size.


2.
 Peel the carrots and finely grate them. Peel the ginger and grate finely as well.
Mix the cheese, carrots, chopped coriander leaves, finely grated ginger, ricotta,,
egg  yolks, curry powder, salt and a dash of Cayenne pepper.
Prehat the oven at 190°C/374°F.


3.
Place the dough on a floured surface and with the rolling pin, roll-out the dough til
it becomes the size of approximately 50x20 cm. Distribute the fillings evenly onto the  dough , leaving free 1.5 cm on each side.


4.
Roll the dough as in jelly roll, the filled dough and cut it into 12 pieces
of about 4 cm wide. Put pastry paper into the Muffin form and place each of the cut dough into the form.Let dough stand for 15-20 minutes to settle down. Put the Muffin form in the middle rack of the oven and bake the Muffins between 15-20 minutes until they become golden brown.


Thanks for reading this posting and wish you all in good
health!
 
Happy Baking!!!
 

Mercy


Easy Orange Cheesecake


Today, we´re supposed to go to a quilt exhibition in Lower Austria, but then, the weather keeps on  changing so often.... a bit drizzle here, a bit dark clouds there.  And so, we were thinking on wat to do... go to the Saturday flea market?.... still unsure of the weather, we decided to stay home...

Having finished my 2nd handquilted pillowcase ,  I though that it would be  a lovely idea to bake and try a new cheesecake recipe which I haven´t baked before... and so this scrumptious cheesecake was born.  The base dough is so easy to make. Here´s how  I did it and
I´m sure you would love this one.


Easy Orange Cheesecake 

Ingredients

Dough
 180 grams Flour
60 powdered sugar ( you can use sugar substitute of 7 tbsps Stevia powder)
Salt ( dash)
125 grams butter
1 egg yolk


Cheese Fillings
 250 Curd Cheese ( look for  "Quark" as the germans call it)
1 egg and 1 egg yolk ( medium size)
60 grams sugar
1 pack Vanilla sugar
20 grams Cornflour
60 grams liquid butter ( liquify thru microwave oven)

plus: dried beans for blind baking
         2 - 3 oranges thinly sliced, rind, skin  and seeds removed
         confectioner´s sugar or powdered sugar for topping


  Preparation:


1. Mix together flour, powdered sugar, 1 pinch salt, cut-up  butter (cubes) and egg yolk in a bowl. Knead til  the dough becomes smooth. Cover and refrigerate for at least 30 minutes.


2 In a bowl combine curd cheese, egg, yolk, sugar, vanilla sugar, starch until all ingredients are well blended. Stir in butter. Mix well. Preheat oven to 190 ° C (fan 170 ° C).


3.Roll out dough on a floured surface until the dough reaches the size of the tart
     form you are using. Place the dough and tuck it on a tart form, you may use a round form or  a square and add a parchment or baking paper on top of it, add the dried beans and blind bake the pastry ( prebaking of the pastry so it won´t make bubbles).

4.  Bake the pastry in  the oven  for around 15 minutes. Remove baking paper and bake pastry for 3-4 minutes more. Remove and allow to cool slightly


4. Peel  the oranges and remove the white skin. Cut the oranges thinly. Remove any existing seeds.

5. Add the cheese filling in the pre-baked pastry and on top of it,  spread the orange slices as toppings and  bake cake in the oven for about 35 minutes. If desired, sprinkle cheesecake with icing sugar. Can be served hot and cold.


I hope you try this easy one .

Enjoy whatever you´re doing!

HAPPY BAKING! 


The Happy Squash


Planted in a raised bed and getting plenty of my attention..
 this squash is enjoying life as the star in my container garden up in my terrace.


Its raised bed is made of  4 big concrete blocks that I got from
the hardware store.


I had to grow the vine vertically as I didn´t have enough terrace space.


Growing vertically, the vine started to climb on top of the conifer hedge...


Its flowers were so lovely that I took a shot having the blue sky as background


...and their leaves were so huge that one could have thought of being in a lilliput land...


I knew that the squash would grow on top of the conifer hedge, so I placed the vine in such a way that the fruit would manage to grow in the middle of the pine trunk ....that way, the fruit wouldn´t damage the hedge because of  the weight.


...and then there was this one fruit growing behind the satellite antenna... actually, the very 1st that grew so rapidly each day..


...when the plant started showing the first fruits, I cut the the tips of the vine from different directions so as to stop the plant from growing further. This way, the energy delivered by the feeds and water went directly to the fruit and enhanced more growth.


As the flowers were blooming, I cut some and use these for my culinary cooking. Below is an example of what I cooked out of the flowers.


If you would like to try my recipe for the stuffed squash flowers, here is the link: 


....and because I was growing it in a raised bed, I decided that I would only grow 2 fruits.. the first squash behind the parabola antenna didn´t make it and  died-off after it had almost 3 kilos. For obvious reason, it didn´t like the stockings I used to support its weight during the growing process.


This is the squash that grew right on top of the hedge and weighs  around 
 9.20 Kgs/ 20.30 lbs.  Can´t wait to cook various casserole dishes, salads, cake  and make a portion into chutney out of this versatile veggie. I harvested this last Thursday and I should say my squash had been a "good omen" for
Friday, the 13th. 

* * * * * *


Thank you for reading this blog and wishing everyone an enjoyable
Sunday!

MERCY

Green Bean & Turnip Gulasch


This is basically very easy to cook. The origin of Gulasch (Beef) is said to be in Hungary where they use sweet Paprika as main seasoning. This dish is my own version.


Green Bean & Turnip Gulasch


 Ingredients ( 4 Portions)

200 grams ground Beef ( or 50-50 Beef/pork filet)
1 sausage , any would do (optional) - cubed
1 onion-cubed, 2 cloves crushed garlic
1 each red & yellow bell pepper - cut into square pieces
10 medium size mushrooms - thinly cut
2 tbsp soya Sauce
250 grams flat green beans - thinly cut ( elongated as in photo)
1 medium White turnip - thinly cut as in the green beans.
2 tbsp sweet paprika powder
3 tbsp creme fraiche or sour cream
salt & pepper to taste
cooking oil for the frying pan


 Preparation:

1. Heat the pan w/ 2 tbsp. cooking oil, fry the garlic then add the ground meat til  
it becomes pale in color and water evaporated. Add the onion and fry til onions
get glossy. Season with salt & pepper.. set aside

2. Steam the green beans and White turnips in a steamer until they become soft
about 10 minutes, remove from steamer and tranfer the beans & turnips in a
colander and rinse under running cold water to prevent beans from loosing the
green Color.


  3. In a deeper casserole, transfer the meat and add the vegetables and 2 cups of
water ( or vegetable soup ), let boil, then add the Paprika powder, 2 tbsp of
creme fraiche or sour cream. simmer for about two 5 minutes, then add 2 tbsp.
of corn flour dissolved in 1/2 cups water + 1 tbsp soya Sauce, mixed well while
the liquid gets thicker but not dry...if possible add more water or soup, adjust
seasoning..
Serve hot with rice or baguette/white bread.


      Happy Cooking!

 
Shared this recipe at
 
Spatulas On Parade 

White On White - Pillowcase


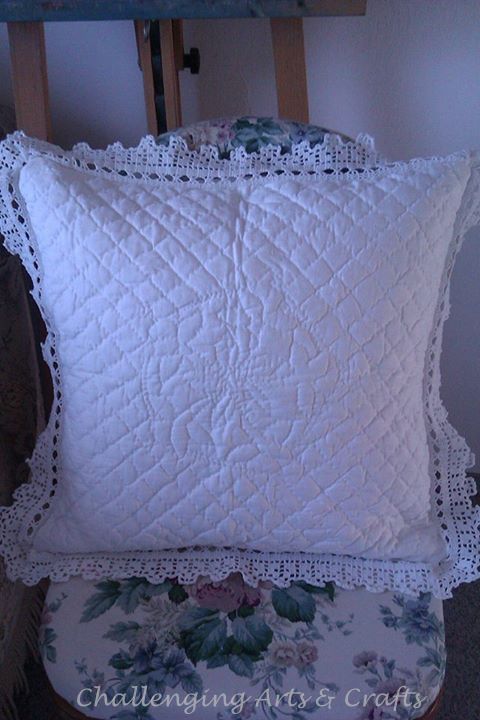
 My concept about white on white is something of an  embroidery using white background and stitches using white thread . It can be linen that has monograms on it or simply a tablecloth with flower designs.. I called this project white on white because it has all the attributes of being one....handquilted, thread used is white, white background and above all the white crocheted lace. 


The crocheted laces above were made by me without having any options on what to do with them... I had the thread and I wanted to crochet something while watching TV or listening to music. . At first, I intended to use them as lace for the skirt of the bed canopy and it stayed being just a lace for really a long time, something like 5 years or so until I  decided to use them last week.


 The quilted top of the pillowcase has a simple quilt pattern, simlpy criss-crossing lines using masking tape as guide. The middle part had been a flower design although when quilted, it wasn´t clear enough to see that it is a Cluster of flowers.


Anyway, the quilt top had also been there for a long time and was never touched for a couple of years...So,  last week I took all my efforts to start with the blue pillowcase
which I have featured in my post before this one called
http://challengingartsandcrafts.blogspot.co.at/2013/09/its-finished-handquilted-blue-white.html   


I had to join both Ends of the lace by Hand before attaching it to the quilted top.  


 ....then I pinned it in place and sew the sides of the lace to the quilt top.

Then I set to work on the back side of the pillow, cutting a white Cotton fabric into two parts with an overlapping opening using those vintage button I used for the blue & white pillowcase.. 

The size of the pillowcase is 50cm x 50cm (19.68 inches x 19.68 inches) 


Now that this is done, I have to tackle the 2nd pillowcase that is  part of this set of 2 and it will surely be as pretty as this one...

Here´s wishing everyone a happy weekend ! 


It´s finished !!! Handquilted Blue & White Pillowcase


     Can you imagine that this pillowcase had always been my WIP ( work in process) project since 7 years or so? Well, not until last Weekend.. got all my guts to really finish this one...


       It was in those days that I had so much time and energy to do projects particularly sewing and home decorating... But then, something came up before I could execute all my crafts ideas...I need to work for my pension scheme and started putting away all my pending projects and went back into my corporated world..


This pillowcase is part of a set of 2 that I handquilted....The 2nd pillowcase was transformed into a BAG below !!!

 you can view more photos on the link below


 http://challengingartsandcrafts.blogspot.co.at/2012/08/mercys-handquilted-bag.html 


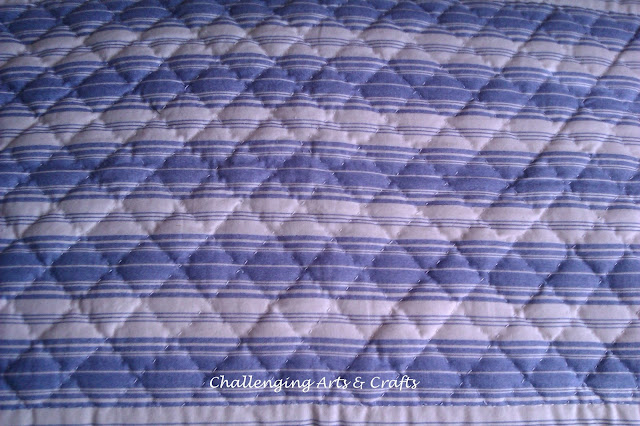
The trick of the handquilting is that, I used masking tapes to set the lines straight, no need to have templates if you are just quilting simple lines and squares...


     The Pillowcase front


The inner side of  the top part. 


  I cut the back fabric into two for the closure since I´m using buttons. 


I got these vintage linen buttons from hubby´s Grandma, I love using them when I make pillowcases. These are the ones I used for the closure..


 I think the style of the button fits well to the button hole....


 Here , I cut a dark blue fabric as contrast border  making a piping for all the 4 sides.  


Here´s hoping that you like today´s blog. Am glad that you took time reading me.


THANK YOU !

 
XOXO;
 
Mercy