 On my way home, I found this chair standing next to a huge building container along the main road waiting to be picked-up by the garbage truck. The owner was disposing it because its style didn´t fit into their newly renovated house. The chair was shabby and old, but it had potential, so I stopped-by and carry it home. I removed the old upholstery, stripped-off its varnish, sanded it, then painted it with a transparent acrylic paint. Then I cut a new sponge to the shape of the removable base, glue the sponge to it,then covered it with an english style cotton fabric. I found it easier to use a manual tacker than an electric one. Screwing the base to the chair was the easiest part and the nicest part is putting the green edge lace.
 The New Life of an Upholstered Chair
 On my way home, I found this chair standing next to a huge building container along the main road waiting to be picked-up by the garbage truck. The owner was disposing it because its style didn´t fit into their newly renovated house. The chair was shabby and old, but it had potential, so I stopped-by and carry it home. I removed the old upholstery, stripped-off its varnish, sanded it, then painted it with a transparent acrylic paint. Then I cut a new sponge to the shape of the removable base, glue the sponge to it,then covered it with an english style cotton fabric. I found it easier to use a manual tacker than an electric one. Screwing the base to the chair was the easiest part and the nicest part is putting the green edge lace.
 I Love Quilts!
Yes, I do love them. I got fascinated with quilts during my college days that started with a picture I saw in an american quilt magazine. I´ve researched on its "how to´s" and found out what materials and techniques are required...It was not until the 90´s that I made my very first one.
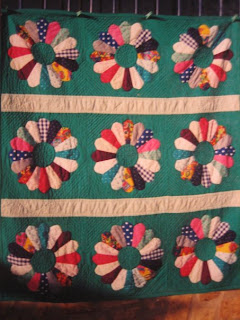
Dresden Plates....Vienna, 2000. One of my first Quilts that I started in 1991, put aside, finished 9 years later.... Dresden is a place in East Germany where the world famous ceramic factory called Meissner Porzellan is located. Coming up tomorrow.....I will share with you a chair and a footstool upholstered in english fabric. Enjoy your day, everyone! Til next, Mercy
Father´s Legacy
I was never into Carpentry, but I always admire the works of my Dad, he was an expert in cabinet making, all those joints putting pieces together without using nails. He made all those kitchen cabinets , wardrobes and boxes in our house to hold things. We even had a wooden pine shaped-tree that held Christmas presents. The tree was a miniature wooden piece and its original was actually almost a lifesize pine tree of about 2.5 meters high he custom-made for a rich chinese businessman. I remember it was painted white to reflect the winter woods in cold countries. While girlfriends of my age played with their dolls and barbies at that time, I was with my 5 brothers playing and exploring the building structures in my Dad´s work place, he was the construction supervisor of the first international airport in Manila in the early 60´s. And so to this very day, vivid thoughts on woods filling the area everywhere still linger on my mind...beautiful thoughts!
The very first carpentry DIY I did was made in Vienna a couple of years back. A visit to Bauhaus triggered the making of this Bathtub caddy.
The Bathtub caddy holds not only my shampoos and bath soaps but also wine glasses and candles, it creates a very relaxing atmosphere! I hope you would agree. Til next, Mercy
Necklaces
Mineral and semi-precious stones are very fascinating materials to work at. It´s so amazing how a simple stone can be turned into a fabulous jewel. For me, everything handmade is very special and no matter how much time is involve to create something , I keep it going til the project is perfect for my eyes. Here are some of the necklaces I have made so far..


Til next,
Mercy
This is one of the very first necklaces I made out of african Malachite, brass wires and spacers.

These are lapis lazuli stones that were set on a brass wire, I added the sponge coral which I recycled from an old necklace.

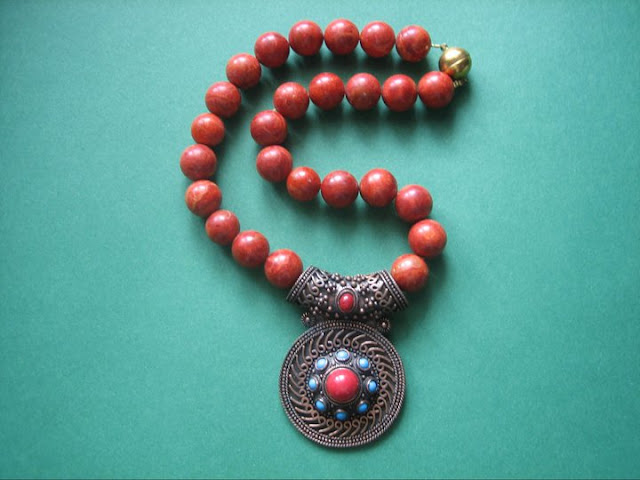
I used big round sponge coral for this one, the pendant was from another necklace found at a fleamarket and is made of metal that already had the stones attached to it.

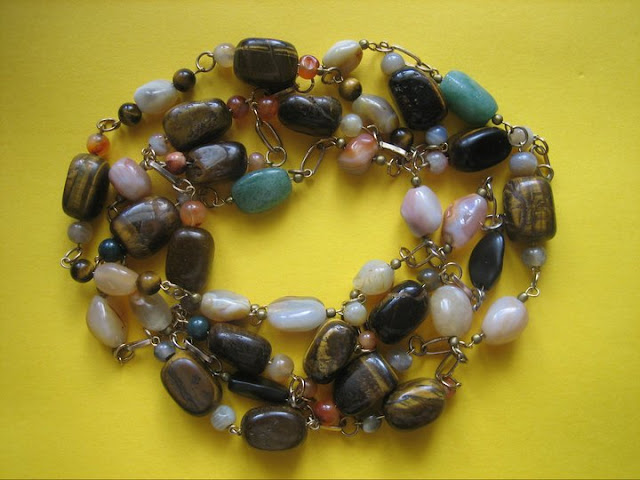
And lastly, this necklace is composed of various minerals like agate, tiger´s eye. etc
Making them is somehow a form of a stress reliever for me after an exciting busy day at work.
Til next,
Mercy
For The Love of Nature
For The Love of Nature
by Mercy G. Gallardo
in the midst of the morning dews
my dream vanished in its hues
I see you in the soft touch of light
thought of it as love at first sight……
the solitude of a pathway deafening
but what follows later enticing
for when larks start humming
new days enhance a bright beginning…..
your beauty is a delight beyond compare
it´s nice to know the pleasure you share
I love the thought of being near you dearly
tis a pledge I´d like to go through clearly…..
I praise the Almighty for his creation
in silence I give him my appreciation
it is said that poems are made by fools like me
this I let be, for mother nature I truly love thee.
Crocheted Laces
I started crocheting at 9 presenting my mom a band of curtains that she proudly displayed on her canteen window. It was a self-taught process. Maybe it is the challenge that hit me at this young age thinking if others could do it I could do it too. From there, I´ve been doing the craft eversince. And here, I´d like to share a few of the past projects that I did.
Some of these laces have been crocheted on my way to work or while watching TV. If you are "hooked" on this craft, there isn´t any border on what beautiful laces you could create out of a hook and thread.
I will show more of my work later. In the meantime, I´m out for a siesta, it´s kinda hot and humid as we are experiencing a changeable weather right now in Vienna. Enjoy your time wherever you are in this part of the world.
Til next,
xoxo
Mercy
Apple Tart + Recipe
Ingredients:
Pastry
500 g all purpose Flour
30 g Sugar,
a dash of salt,
200 g Butter chopped into small squares,
1 Tbsp Table Vinegar,
10 Tbsp cold water.

How to make the Pastry:
1.In a container, mix all dough ingredients as in above, knead well until dough is smooth and can be formed into a ball.
2. divide dough into two, or put into plastic bags to let them stand in the fridge for 2 hours....
3. Roll- out 1 dough onto a floured surface, make it flat by using rolling pin... shape the dough according to the springform you are using..let the flat dough cover the whole baking springform
( see foto )...
4. Fill- up the springform with the cooked apples adding raisins and the chopped almonds, mix until all apples are filled onto the baking container...
5. roll-out the 2nd dough , by using pizza roller, cut the dough into strips ( see foto) to cover the tarte like grids alternately.

Apple Fillings:
1.5 kg apples
100 g sugar
50 g brown sugar
30 g Flour 1 tsp grated lemon peel
1 tsp lemon juice
1/2 tsp Nutmeg
1 cup chopped almond nuts
2 Tbsp Milk.
4 Tbsp Marmalade of your choice.

Cooking apple fillings:
1. peel and remove seeds & cut apples into small pieces or thin slices, slow cook in a casserole adding all Ingredients (except the 30 gms flour, raisins and chooped almonds) until apples become soft (about 5 minutes,) let cool.
2.mix the flour, raisins and almonds well into the apples and put the fillings into the springfrom (see foto). Heat 4 Tbsp of your favorite marmalade on microwave oven, distribute this on top of the fillings before you put the strips of dough as Tarte crust.

3. in a preheated oven and on middle tray holder , bake the Tarte for about an hour under 180°C or 356°F.
When done, sprinkle the Tarte with sugar...serve hot or cold!

P.S. you can use various baking forms for the apple tart, shown here are the tartlette forms and the 2nd one is a bigger springform with removable bottom/base.
HAPPY BAKING!
Simply Woodworking

I have added compartments to hold various things and it now functions as a sewing
box.


A self-made stencil was also added so it would look more shabby and romantic..

I had fun doing this project because the result are there for me to enjoy...
A Romantic Bedroom
I also designed this bed canopy, brought the template to a local town carpentry shop and ask the guys there to cut it for me. Found out that the shop owner is a German and so communicating what I want was no problem. The canopy curtain fabric was bought at a dicount shop near the Malaga Airport and the shop specializes in discontinued english fabrics...I was lucky to have gotten the back curtain for a price of 1 Euro per meter and I guess, the bed canopy and its front curtain picked-up the blue color of the back curtain.

I hope that this posting may inspire you somehow in decorating your home.
Til next,
Mercy
Shared at : The Dedicated House - Anything Blue Friday Week 51
First Attempt
Hello!
This is the very first posting on my blog. After various trials of setting up its format, I ´m still undecided as to whether this is the right frame I´d like to have. I hope I´m finally done so I can share my day to day Challenges with everyone.
To start with... I´m sharing here one of my very first attempts at oil painting! I didn´t have formal courses on this. I just knew that I wanted to paint, so I made researches, got books on the issue as well as the basic materials. It was sort of a trial and error creation based on the orchids given to me by my husband.. Well, everyone has to start from the very beginning.
Have a blessed weekend everyone!
Mercy
Subscribe to:
Posts (Atom)


